Here’s a tiny backstory: Looking back into the past five to six years, homelabbing has been one of greatest pleasures to fiddle around and come up with the right setup for whatever I’m learning. I’ve went from VMs on my laptop to using XEN on some old machine to VMware ESXi. ESXi is great, but with time, I kept finding myself doing a lot of the same thing over and over, and although I automated most parts that are repetitive, I felt like I wanted something a bit quicker that just works.
For around two years, oVirt has been my choice for hosting my run-of-the-mill – mostly linux – labs. It works well with images, it can be automated, and it does nested virtualization very, very well. Nested Virtualization and speed to bring VMs up were my two absolutely favorite parts, especially as I started working on Contrail and Openstack. I still happily run oVirt today for everything, except Networking Labs. That’s the spot I realized I needed something fresh that tackles the problem of network devices labs in a smarter way.
Enter EVE-NG
My problem began when I needed to run labs containing network devices (Juniper vMX, vSRX, Cumulus, VyOS, etc). Unfortunately, creating such labs over oVirt or even nested over KVM within a linux host can be very tricky and time consuming with lots of moving parts that can easily break it. It just didn’t make sense to me that running a back-to-back connection between two devices meant you’d create a bridge and link both VMs on it. This is also how ESXi does it apparently, and it is a very tedious process that I don’t think I’d want to go through when I want to quickly spin something up to try it. That’s when EVE-NG came into the picture.
Emulated Virtual Environment – Next Generation (EVE-NG) simplifies the process of running labs containing network devices, and the way to interconnect them with other virtual nodes. It solves the missing piece of making such labs easier to build, and it does it in an intuitive way.
EVE-NG supports a whole bunch of disk images to be used when building labs. You have Linux (of course), and you have an increasing list of supported network virtual devices including Juniper, Cisco, F5, and many others. You can check the full list here. The User Interface of EVE-NG makes it so that the topology you see does actually work. You can place the devices, Drag-and-Drop cables to establish connectivity between the devices and select the wanted ports, re-organize and label things, it just does it in a good presentable way that also allows a speedy lab building process. There are many other features that you should definitely check out on their website
EVE-NG Deployment Options
EVE-NG can be deployed on Bare Metal, as a VM over VMware (ESXi/Workstation/Fusion), or as VM over GCP. I would highly recommend sticking with officially supported deployment options to ensure that you’re getting the best possible performance, as well as support over the community chat.
From my personal experience: Go for Bare Metal installation. It provides the best possible performance for the hosted VMs. While you can deploy it over some other platforms (I tested EVE-NG Nested over oVirt), it won’t work as good. Just to give you an example: Booting vMX 17.4R1 over Nested EVE-NG over KVM used to take me ~50mins until everything is up. On Bare, it takes roughly 7 minutes from booting to FPC becoming online! Oh and it gets better: vQFX starts in less than 3 minutes for me! That’s huge.
Community VS PRO Edition
There are two flavors of EVE-NG: Community and PRO. Both share the same list of supported images, but the differences are mostly about features. While I believe Community edition will be suitable for most people – I’ve used it for a while -, the reason I went with PRO edition is literally one feature: Hot Linking. Hot linking allows you to interconnect nodes while running, without needing to shut the nodes down, modify the connectivity, then start again. Want to connect eth0 or a linux box to xe-0/0/0 on vQFX? 4 clicks and you’re done. Convenience, and time saving. Some other PRO features like Integrated WireShark and ability to run Containers in Labs are good to have, but it depends on what you plan to run. In a nutshell, go for a test of Community edition, then switch to PRO if device linking becomes irritating.
Before You Begin
Let’s say by this point you decided to deploy EVE-NG. The official documentation covers each deployment scenario and what you need to do for it. As I recommend to go with bare install, make sure you’re using Ubuntu 16.04 LTS for it as its the supported release for now.
One thing I would recommend to do after you install eve is to also install client side supporting packages for your operating system. When accessing your labs, you can select to either login via HTML5 Console or Native Console. HTML5 console opens a tiny popup within the Lab View which you can use to interact with the device. Native Console opens a console connection via your terminal application (iTerm, SecureCRT, etc). Installing the client side packages help make that work, and they contain other additions as well.
Your First Lab: Getting Images
Alright, you made it this far!
The first step for you to be able to start labbing is of course, getting the images of devices you plan to use. While EVE-NG can theoretically support a lot of virtual editions of network and system devices (thanks to the community for sharing their experiences!), it would be recommended to stick to the officially supported images, at least at the beginning until you are comfortable enough with the platform. Also, note that the setup for each virtual node must follow some specific disk images naming convention detailed here.
In the following examples, I’ll highlight the procedures for Juniper vQFX, vMX, vSRX3.0, and Linux.
Juniper vQFX
Start by obtaining the vQFX images from Juniper Downloads website. For vQFX, we need to download two images: PFE Disk Image (QCOW) as well ask RE Disk Image (IMG). For this test, I’ll use 18.4R2-S2.3.
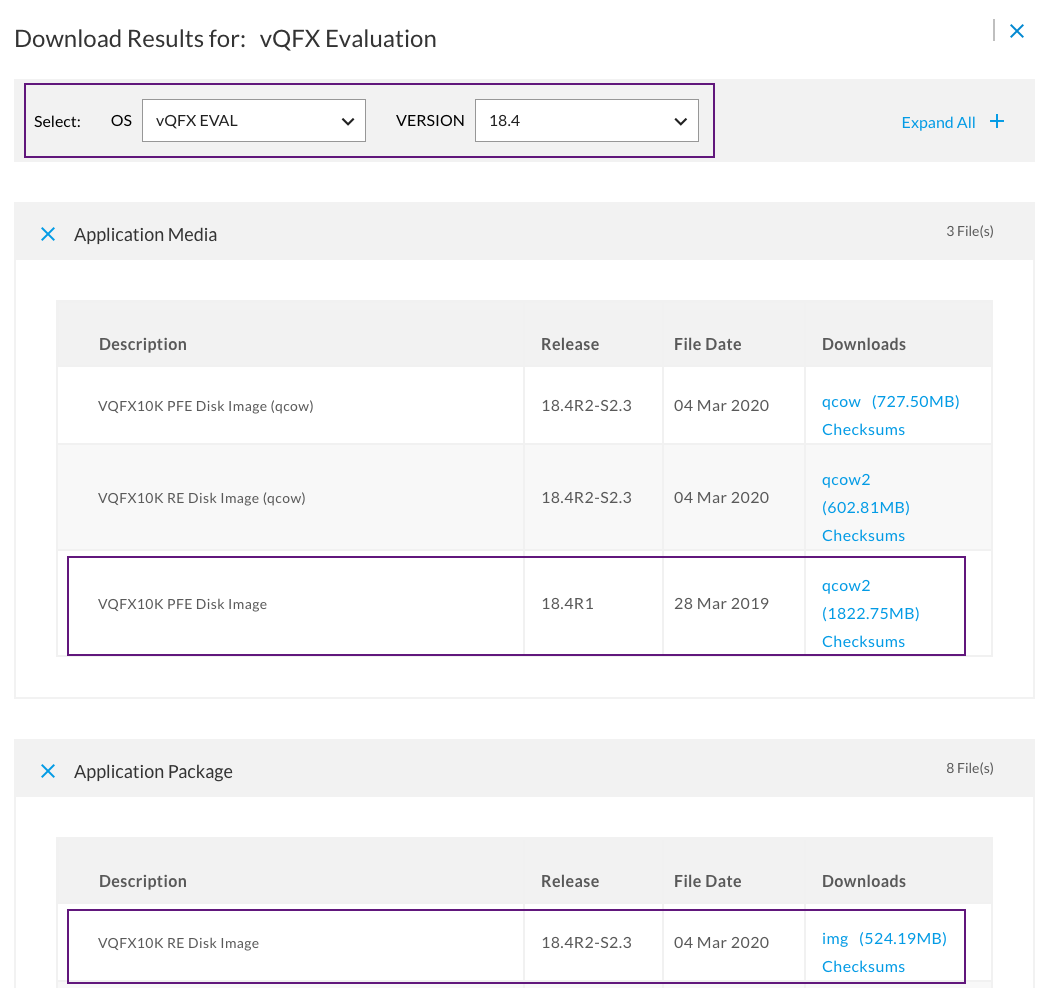
After downloading both images to your server, you will end up with two files:
- PFE: cosim-18.4R1.8_20180212.qcow2
- RE: jinstall-vqfx-10-f-18.4R2-S2.3.img
We will start by creating the directories where those images will be hosted:
mkdir /opt/unetlab/addons/qemu/vqfxpfe-10K-F-18.4R2-S2.3
mkdir /opt/unetlab/addons/qemu/vqfxre-10K-F-18.4R2-S2.3
Next, move the downloaded images to their respective directories. Keep in mind that you MUST follow the naming convention discussed above or else your device will not be able to boot:
mv /root/cosim-18.4R1.8_20180212.qcow2 /opt/unetlab/addons/qemu/vqfxpfe-10K-F-18.4R2-S2.3/hda.qcow2
mv /root/jinstall-vqfx-10-f-18.4R2-S2.3.img /opt/unetlab/addons/qemu/vqfxre-10K-F-18.4R2-S2.3/hda.qcow2
Last but not least, there’s a script that must be executed whenever making changes in images or template, to make sure that proper permissions are set on the files:
/opt/unetlab/wrappers/unl_wrapper -a fixpermissions
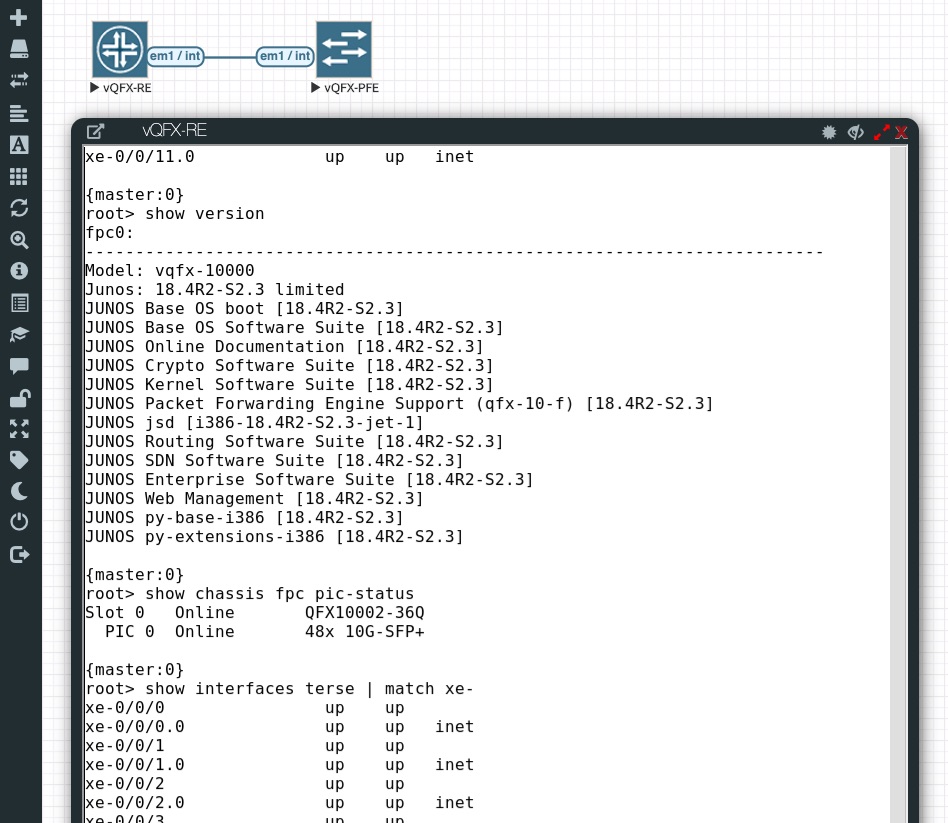
That’s it! If all goes well, you should be able to boot your first vQFX instance from EVE-NG UI:
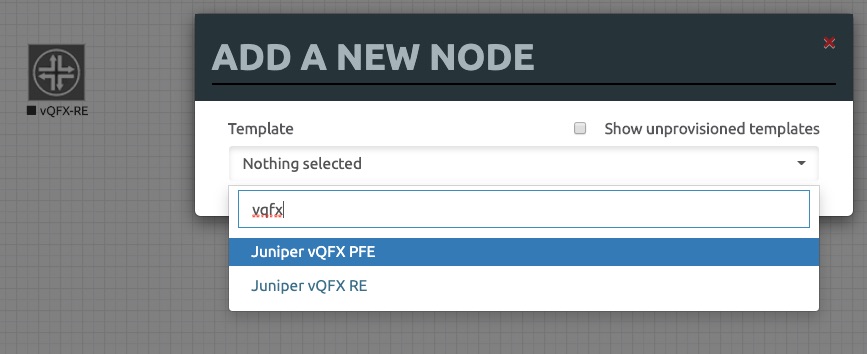
Add the nodes (PFE and RE): Right Click => Nodes:
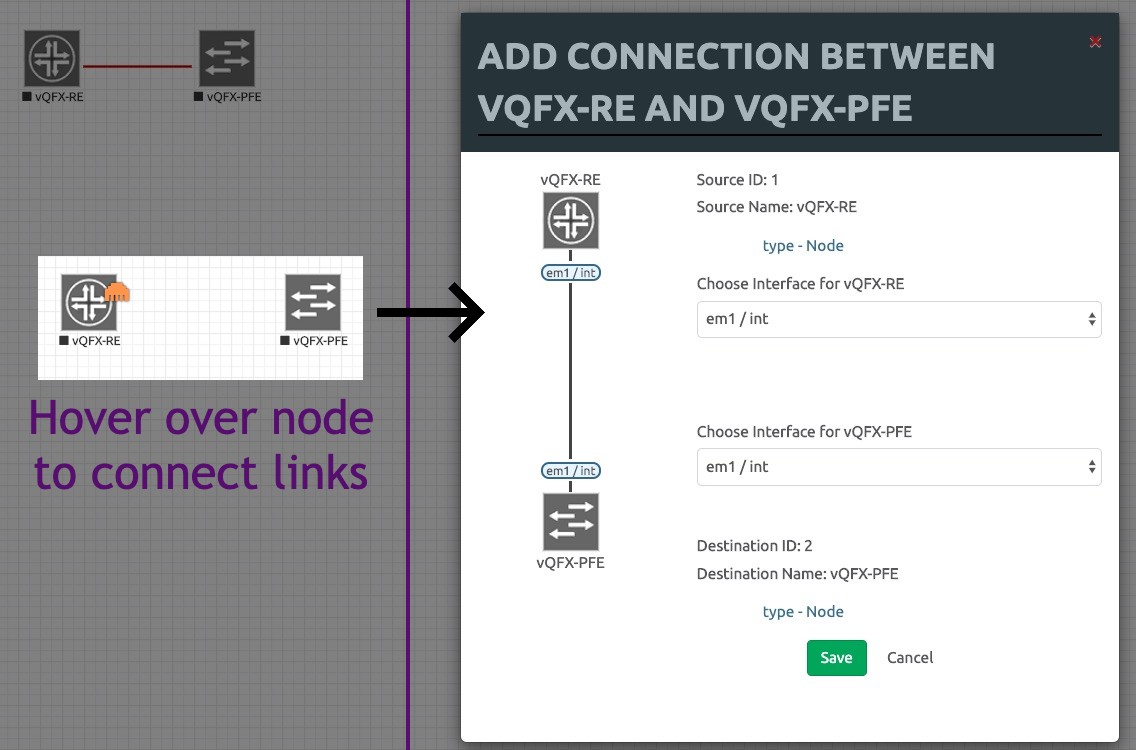
Add connectivity between RE and PFE (em1 / int) using Drag-and-Drop:
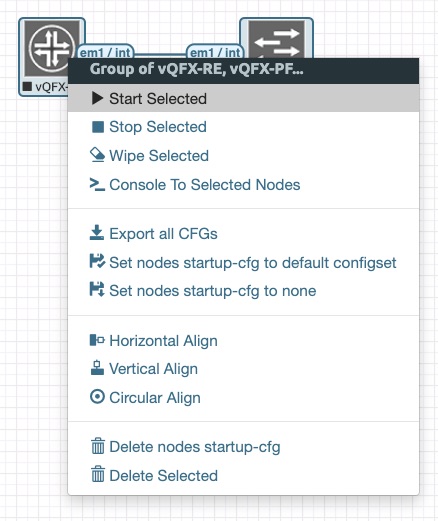
Start Nodes (Right Click => Start), and check Console (Click Node). Here I’m using HTML5 Console:
Juniper vMX
vMX works in pretty much the same way as vQFX (two nodes), but it consists of multiple disks. Also the download size is probably the biggest you would see. Grab the bundle tagged as KVM from Juniper website, likely to be named along the lines of vmx-bundle-19.4R1.10.tgz.
First, extract the tarball:
tar xvf vmx-bundle-19.4R1.10.tgz
cd vmx/images/
Next, create the image directories:
mkdir /opt/unetlab/addons/qemu/vmxvfp-19.4R1.10-domestic-VFP
mkdir /opt/unetlab/addons/qemu/vmxvcp-19.4R1.10-domestic-VCP
We’ll start with VCP, copy the following three files to the VCP folder:
cp junos-vmx-x86-64-19.4R1.10.qcow2 /opt/unetlab/addons/qemu/vmxvcp-19.4R1.10-domestic-VCP/virtioa.qcow2
cp vmxhdd.img /opt/unetlab/addons/qemu/vmxvcp-19.4R1.10-domestic-VCP/virtiob.qcow2
cp metadata-usb-re.img /opt/unetlab/addons/qemu/vmxvcp-19.4R1.10-domestic-VCP/virtioc.qcow2
For VFP, only one file needs to be copied:
cp vFPC-20191114.img /opt/unetlab/addons/qemu/vmxvfp-19.4R1.10-domestic-VFP/virtioa.qcow2
Fix the permissions:
/opt/unetlab/wrappers/unl_wrapper -a fixpermissions
Juniper vSRX3.0
The cool thing about vSRX3.0 is that it’s a single image, so grab the qcow2 images for your desired release from Juniper Downloads, which should be named something like junos-vsrx3-x86-64-20.1R1.11.qcow2. Make the directory for it, place the images and fix the permissions:
mkdir /opt/unetlab/addons/qemu/vsrxng-20.1R1.11
mv /root/junos-vsrx3-x86-64-20.1R1.11.qcow2 /opt/unetlab/addons/qemu/vsrxng-20.1R1.11/virtioa.qcow2
/opt/unetlab/wrappers/unl_wrapper -a fixpermissions
Here’s what my directory structure looks like:
root@EVE:/opt/unetlab/addons/qemu# tree -a
.
|-- vmxvcp-18.4R3.3-domestic-VCP
|   |-- virtioa.qcow2
|   |-- virtiob.qcow2
|   `-- virtioc.qcow2
|-- vmxvcp-19.4R1.10-domestic-VCP
|   |-- virtioa.qcow2
|   |-- virtiob.qcow2
|   `-- virtioc.qcow2
|-- vmxvfp-18.4R3.3-domestic-VFP
|   `-- virtioa.qcow2
|-- vmxvfp-19.4R1.10-domestic-VFP
|   `-- virtioa.qcow2
|-- vqfxpfe-10K-F-18.4R2-S2.3
|   `-- hda.qcow2
|-- vqfxre-10K-F-18.4R2-S2.3
|   `-- hda.qcow2
`-- vsrxng-20.1R1.11
    `-- virtioa.qcow2
Note on Multiple Releases
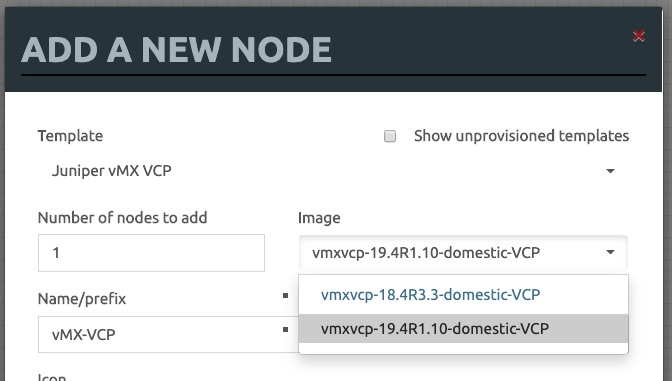
As you have probably noticed, the directory naming under /opt/unetlab/addons/qemu/ contains a prefix for the device name, disk type (RE, PFE) if needed, and the release. You can download multiple releases of the device and place them in their respective folders, then from the WebUI, when booting the node you will have the ability to select which release you would like to work with:
What about Linux?
The method I suggest to use when deploying linux boxes inside of EVE-NG is to create your own disk image that is re-usable as many times as you want. Yes you can run the installation of a linux box using a CD image every time, but remember our goal here: Build Labs Fast.
Here are the procedures for deploying and creating a CentOS 7 image:
Start off by downloading the installation media and placing it within the image folder for the linux host. We will use it for the first time only:
mkdir /opt/unetlab/addons/qemu/linux-CentOS7
cp /root/CentOS-7-x86_64-DVD-1810.iso /opt/unetlab/addons/qemu/linux-CentOS7/cdrom.iso
Create the disk image for the linux host. Here I will specify the size as 100G, but it will be a thin provisioned disk (will not allocate 100G from the disk immediately):
$ /opt/qemu/bin/qemu-img create -f qcow2 /opt/unetlab/addons/qemu/linux-CentOS7/hda.qcow2 100G
Formatting 'hda.qcow2', fmt=qcow2 size=107374182400 encryption=off cluster_size=65536 lazy_refcounts=off refcount_bits=16
Great. You can now start installing Linux. I would recommend to connect the node to Cloud0 network to allow it to have internet connectivity, if you would like to have some certain packages prepared when booting later from the disk. I also recommend creating a new Lab for this process, which will simplify a step needing the Lab ID done after the installation.
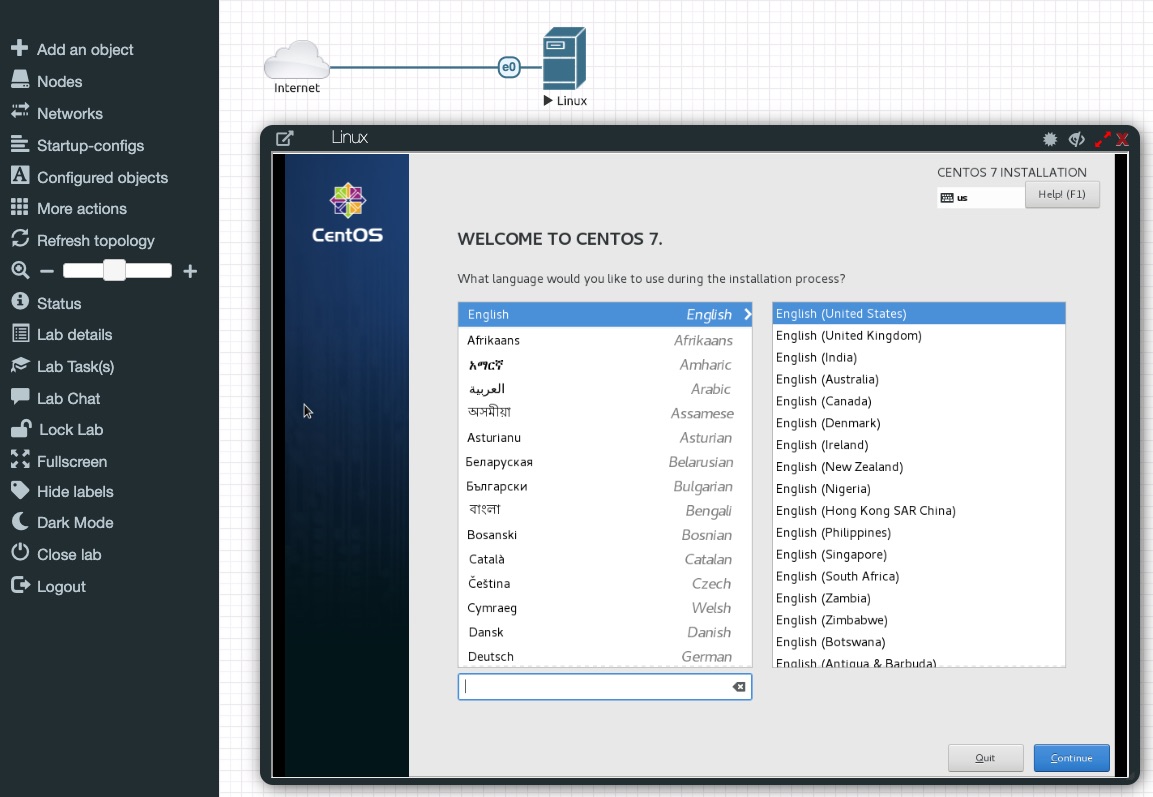
Once your typical Linux installation is completed, shutdown the node, and delete or move the cdrom.iso file out of image directory
mv /opt/unetlab/addons/qemu/linux-CentOS7/cdrom.iso /root/centos7.iso
Start the same node again, and make sure that the OS is working fine. You can configure or install any additional packages on the server at this stage. Once you’re done and happy with how it is, shutdown the node again.
Now’s the important bit. You need to commit the changes done on the disk to the disk of this Linux image. To start, click on the Lab Details button on the side bar, and copy the ID:
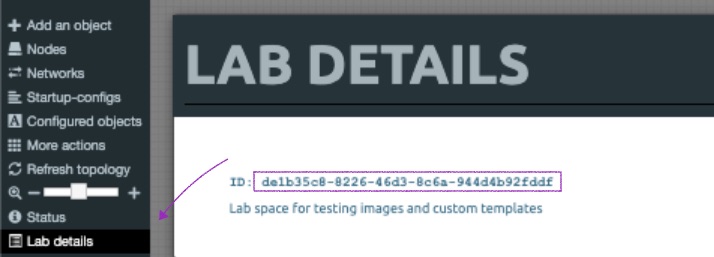
Navigate to that lab temp directory under /opt/unetlab/tmp/0/LAB-ID/1/. For example: de1b35c8-8226-46d3-8c6a-944d4b92fddf
cd /opt/unetlab/tmp/0/de1b35c8-8226-46d3-8c6a-944d4b92fddf/1/
there will be an hda.qcow2 file there. run the following command:
/opt/qemu/bin/qemu-img commit hda.qcow2
As always, remember to fix the permissions:
/opt/unetlab/wrappers/unl_wrapper -a fixpermissions
That’s it. You can create new linux nodes now using that template, and customize the specs as well. Let the fun begin.
What’s Next?
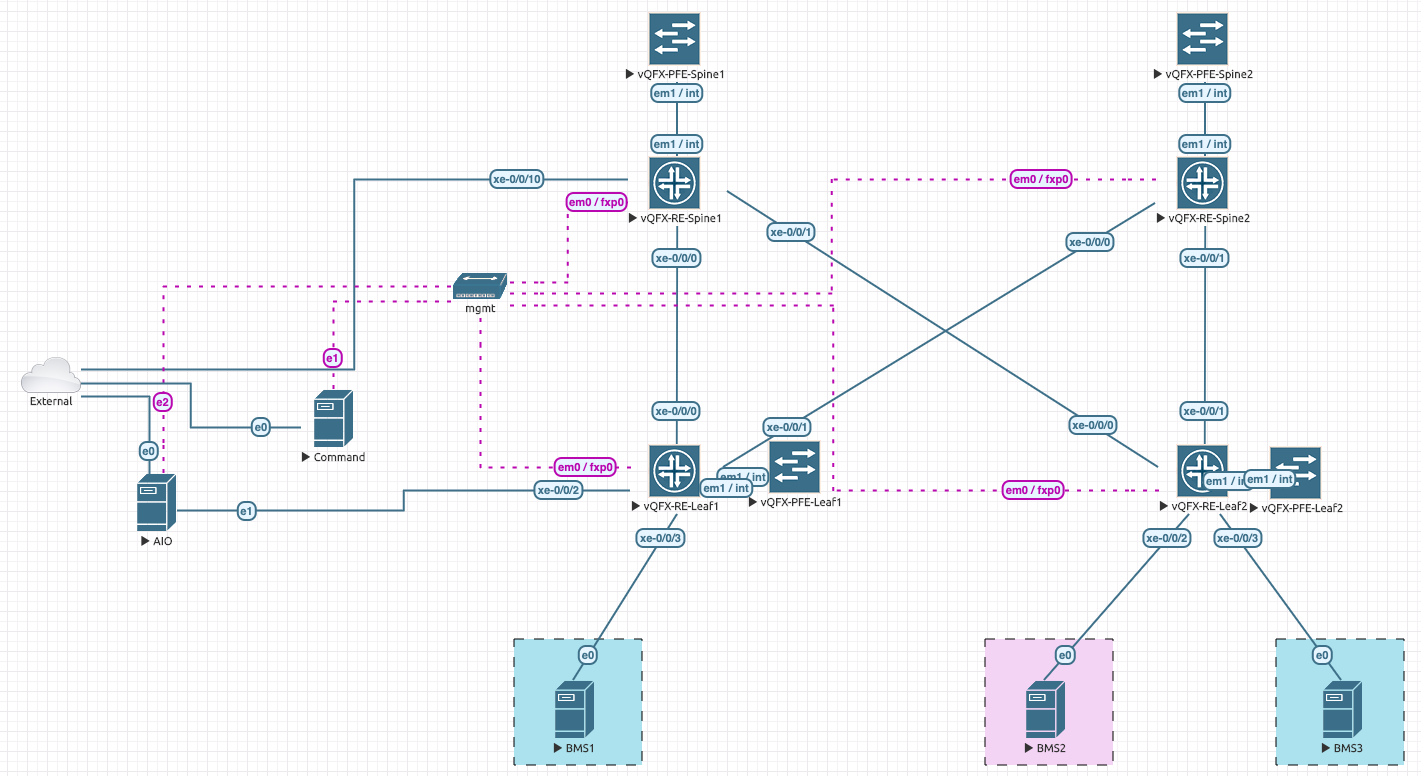
This part is best kept to your imagination. I discussed with a few friends who use EVE-NG before working on this post, just to get a feeling of what they are working on. The answers varied from JNCIE/CCIE preparations to fabric automation to SDN and cloud deployments. Share your thoughts! Here’s one lab I’m working on right now to do fabric provisioning using Contrail:
Enjoy!
Thank you Ameen!!
Great info. and well written.
Thanks a lot buddy for your usual support!
Hi AMeen,
Is Juniper SDWAN lab finished or still working on the same ?
Hi!
I haven’t tested deploying SD-WAN on top of EVE-NG, but I don’t see any reason why it wouldn’t work.
Dude how you changing the flavors of connections? I can’t by the I have a community edition
Hi Saif. I’m not sure what you mean by ‘flavors’ of connections. If you mean the coloring/style, I think that’s a PRO edition feature but I’m not entirely sure.
Hi,
Thanks for this information. Tried to download vqfx but I do have different file name and file type for the PFE.
Your example: cosim-18.4R1.8_20180212.qcow2
Mine: vqfx-18.4R2-S2-2019010209-pfe-qemu.qcow
Hi Mike!
On the downloads page, you’ll find two PFE images for that release. Select the second one
– VQFX10K PFE Disk Image 18.4R1 28 Mar 2019 qcow2 (1822.75MB)
Seems that the image in the post was highlighting the wrong one. I’m updating it now. Thanks!
Hi Bro!
Thanks a lot for the information.
What image do we need to download from the Juniper site for vMX (standard or EVALUATION)?
For VMX EVALUATION there is only the highest release 18.2.
Could you explain the detail of how to deploy vMX, please?
I have trouble – on my lab, there are no GE ports at all!
So I unable to connect to other devices.
root>
root> show chassis hardware detail
Hardware inventory:
Item Version Part number Serial number Description
Chassis VM5F1415F099 VMX
Midplane
Routing Engine 0 RE-VMX
vtbd0 0 MB Hard Disk
CB 0 VMX SCB
FPC 0 Virtual FPC
CPU
root>
root> show chassis fpc
Temp CPU Utilization (%) CPU Utilization (%) Memory Utilization (%)
Slot State (C) Total Interrupt 1min 5min 15min DRAM (MB) Heap Buffer
0 Present Testing
1 Empty
2 Empty
3 Empty
4 Empty
5 Empty
6 Empty
7 Empty
8 Empty
9 Empty
10 Empty
11 Empty
root>
root> show interfaces terse | match ge
root> show interfaces terse | match xe
root>
root>
root> show system software
jail-runtime-x86-32-20200411.2b552dd_builder_stable_11 — jail runtime
jdocs-x86-32-20200429.150822_builder_junos_194_r2 — jdocs
jinsight-x86-32-19.4R2.6 — jinsight
jmrt-base-x86-64-x86-64-20200429.150822_builder_junos_194_r2 — jmrt base x86 64
jsd-x86-32-19.4R2.6-jet-1 — jsd jet 1
jservices-aacl-x86-32-20200429.150822_builder_junos_194_r2 — jservices aacl
jservices-alg-x86-32-20200429.150822_builder_junos_194_r2 — jservices alg
jservices-appid-x86-32-20200429.150822_builder_junos_194_r2 — jservices appid
jservices-cos-x86-32-20200429.150822_builder_junos_194_r2 — jservices cos
jservices-cpcd-x86-32-20200429.150822_builder_junos_194_r2 — jservices cpcd
jservices-crypto-base-x86-32-20200429.150822_builder_junos_194_r2 — jservices crypto base
jservices-hcm-x86-32-20200429.150822_builder_junos_194_r2 — jservices hcm
jservices-idp-x86-32-20200429.150822_builder_junos_194_r2 — jservices idp
jservices-ids-x86-32-20200429.150822_builder_junos_194_r2 — jservices ids
jservices-ipsec-x86-32-20200429.150822_builder_junos_194_r2 — jservices ipsec
jservices-jdpi-x86-32-20200429.150822_builder_junos_194_r2 — jservices jdpi
jservices-jflow-x86-32-20200429.150822_builder_junos_194_r2 — jservices jflow
jservices-llpdf-x86-32-20200429.150822_builder_junos_194_r2 — jservices llpdf
jservices-lrf-x86-32-20200429.150822_builder_junos_194_r2 — jservices lrf
jservices-mobile-x86-32-20200429.150822_builder_junos_194_r2 — jservices mobile
root>
root>
—
What to do?
Hi there.
I tested deploying vMX Eval, and it worked fine using the same steps that are mentioned in the post. For you, it seems that the connectivity between VCP<>VFP is just taking some time to load (as it shows testing without any further details). Depending on how you deployed EVE, it might take more or less time to get it to finish starting.
root> show version Model: vmx Junos: 18.2R1.9 JUNOS OS Kernel 64-bit [20180614.6c3f819_builder_stable_11] --- root> show chassis fpc 0 Temp CPU Utilization (%) CPU Utilization (%) Memory Utilization (%) Slot State (C) Total Interrupt 1min 5min 15min DRAM (MB) Heap Buffer 0 Online Testing 26 0 20 8 3 511 31 0 --- root> show interfaces terse | match ge ge-0/0/0 up up ge-0/0/1 up up ge-0/0/2 up down ge-0/0/3 up down ge-0/0/4 up down ge-0/0/5 up down ge-0/0/6 up down ge-0/0/7 up down ge-0/0/8 up down ge-0/0/9 up downHi ALL,
the problem is resolved, sorry for disturb.
In my case, we MUST NOT change the default CPU & RAM setting for both nodes i.e. lease the same (default).
After that all running fine. Cheers!
root@eve-ng:~#
root@eve-ng:~# ssh 192.168.255.2
Password:
Last login: Sun Jul 19 13:26:03 2020 from 192.168.255.1
— JUNOS 19.4R2.6 Kernel 64-bit JNPR-11.0-20200411.2b552dd_buil
root@vMX1:~ #
root@vMX1:~ #
root@vMX1:~ # cli
root@vMX1>
root@vMX1> show version
Hostname: vMX1
Model: vmx
Junos: 19.4R2.6
JUNOS OS Kernel 64-bit [20200411.2b552dd_builder_stable_11]
JUNOS OS libs [20200411.2b552dd_builder_stable_11]
JUNOS OS runtime [20200411.2b552dd_builder_stable_11]
…ommited for brivety…
root@vMX1>
root@vMX1>
root@vMX1> show interfaces terse | match ge | except \.
ge-0/0/0 up up
ge-0/0/1 up up
ge-0/0/2 up up
ge-0/0/3 up up
ge-0/0/4 up up
ge-0/0/5 up up
ge-0/0/6 up up
ge-0/0/7 up up
ge-0/0/8 up up
ge-0/0/9 up up
root@vMX1>
root@vMX1> show chassis hardware detail
Hardware inventory:
Item Version Part number Serial number Description
Chassis VM5F1440B943 VMX
Midplane
Routing Engine 0 RE-VMX
ada0 27649 MB QEMU HARDDISK QM00001 Hard Disk
CB 0 VMX SCB
CB 1 VMX SCB
FPC 0 Virtual FPC
CPU Rev. 1.0 RIOT-LITE BUILTIN
MIC 0 Virtual
PIC 0 BUILTIN BUILTIN Virtual
root@vMX1>
PS. It is VMware ESXi installation.
Great to know it’s working with you now! I faced the issues with customized RAM/CPU before. Seems like the defaults are the soft spots, you can tweak it sometimes and they work, but not always. If you’re not willing to play with it and see whether they work or not then it’s much better to stick with the defaults.
Hi Ameen, in your post you are mentioning to use 18.4R2-S2.3 image for VQFX but you are downloading 18.4R1.8 for PFE,, Is this correct plz?
Hi Mohit. As long as you use the same version for RE and PFE you should be good to go. The picture is just an example of what to download from the downloads page, regardless of exact release.
Hey Ameen, I have seen cloudmylab.com offers EVE-NG as pre-installed, with a lot of pre-installed images have you tried their services and any reviews?
Hi Ankit. I’m sorry I’m not familiar with them or their cloud labs services.
Hi Ameen,
I am trying to setup a vMX 18.2R1 image on eve-ng but the vCP is unable to communicate with the vFP after connecting them via int linke on em1. The vFP does not start at all . could you help me with this?
Hi Durgesh,
The vMX Day One book has a very good section on troubleshooting that is applicable to vMX on eve-ng. Also, make sure to double check the requirements/steps with the official ones from eve-ng here: https://www.eve-ng.net/index.php/documentation/howtos/howto-add-juniper-vmx-16-x-17-x/
Hi Ameen, Many thanks for sharing and the great summary
You’re very welcome Feras. I hope that you’ve found it useful.
Hi Ameen,
I followed the exact procedure for the same vQFX junos image, however, I am unable to start the vQFXs? Have you ever faced such a problem? If so, what are the step to resolve this?
Thanks
Marek
Hi Marek,
I didn’t face anything particularly odd with vQFX. What error are you getting?
Try to follow the official steps as well and see if they help: https://www.eve-ng.net/index.php/documentation/howtos/howto-add-juniper-vqfx/
Hi Ameen,
Thank you for the response. I have tried both methods but when I try to start the vQFX on eve-ng I get no response. Similar problem with vMX.
It was all working fine a month ago until I decided to upgrade the eve-ng. Since that upgrade, it’s been problematic. I stripped the whole lab, re-installed the ESXi 6.0 and tried to add the eve-ng .ova images which are being denied by the ESXi. I am now running. ISO version.
Another weird thing, while running the /opt/unetlab/wrappers/unl_wrapper -a fixpermissions I am getting following error:
ERROR
HP Warning: file_get_contents(/opt/unetlab/platform): failed to open stream: No such file or directory in /opt/unetlab/html/includes/init.php on line
I found the fix to it but not sure if there is still an underlying problem.
SOLUTION:
=============================
https://winscp.net/forum/viewtopic.php?t=29504
edit line 71 of file init.php
vi /opt/unetlab/html/includes/init.php
remove “platform” from line 71
$kvm_family = file_get_contents(“/opt/unetlab/”);
save file and execute
/opt/unetlab/wrappers/unl_wrapper -a fixpermissions
================================
Kind Regards,
Marek.
Hi Ameen,
I managed to resolve this by rolling back my EVE-NG to an old image from last year or so. One it worked fine and second, I didn’t see the following error this time:
ERROR
HP Warning: file_get_contents(/opt/unetlab/platform): failed to open stream: No such file or directory in /opt/unetlab/html/includes/init.php on line
All vMX, vQFXs and vSRX are now operational.
Kind Regards,
Marek
Hello Ameen,
I would like to sae thanks to you.
But while starting the node its giving me a error.
“vQFX-PFE: Eve Unlicensed (98)”
Any suggestion to resolve the issue.
Hello Uday! Thanks for stopping by.
It seems like a license issue with you EVE-PRO. Check this URL for possible fixes:
https://www.eve-ng.net/index.php/documentation/installation/how-to-re-install-and-re-host-eve-pro-license/
If it doesn’t help, you can contact support here: https://chat.eve-ng.net/home
Hello Mr Ali,
Thank you for sharing.
I have Macbook and struggling to launch the Windows node in EVE-ng… It shows in EVE-ng “node started”; however, it doesn’t turn into a blue icon and doesn’t launch VNC as it is supposed to.
In addition, I have installed “Apple OSX Client-Side”, but that hasn’t changed the result. Do you suggest any workaround?
Thank you in advance.
Hi Yrius,
I’m not sure what’s happening with you, but it might be a resource shortage issue. Maybe the folks on eve-ng live chat could assist you.
Thanks Ameen for an excellent and well described article. Appreciated !
You’re welcome buddy 🙏
Hi Ameen,
have you managed to run this lab “Fabric provisioning using Contrail” on eve-ng? if so, do you have an article on this for me to follow?
Thanks
Mandeep
Hi Mandeep,
Yes, I was able to run it, but unfortunately don’t have it documented on the blog.
If I get to do it again, I’ll make sure to post it.
Thanks!
Hi Ameen,
Have you ever run Virtual chassis in VQFX in Eve-NG too?
I get this warning message when I start on my switches
warning: This chassis is operating in a non-master role as part of a virtual-chassis (VC) system.
warning: Use of interactive commands should be limited to debugging and VC Port operations.
warning: Full CLI access is provided by the Virtual Chassis Master (VC-M) chassis.
warning: The VC-M can be identified through the show virtual-chassis status command executed at this console.
warning: Please logout and log into the VC-M to use CLI.
{linecard:1}
Do you have any idea that can help me?
Hi!
I haven’t tried that before. I’m also not sure if Virtual Chassis is supported or not on your vQFX release.
Try this command and see if it helps: `request virtual-chassis reactivate`
aide moi a résoudre se problème
/opt/unetlab/wrappers/unl_wrapper -a fixpermissions
PHP Notice: file_get_contents(): read of 8192 bytes failed with errno=21 Is a directory in /opt/unetlab/html/includes/init.php on line 71
Hi Salif. You can contact EVE support here: https://chat.eve-ng.net/home